woensdag 2 september 2026

Shed Skin restricted-Python-to-C++ transpiler 0.9.13

I have just released version 0.9.13 of Shed Skin, a restricted-python to C++ transpiler. Shed Skin allows one to effectively convert (or transpile) pure Python code to highly optimized machine code. This comes at the cost though of having to conform to a seriously restricted subset of Python features/libraries. Programs currently also cannot be too large, although it is possible to generate extension modules, that can be used in larger programs.

The following screenshot is of a DOOM engine, that becomes more than 30 times faster after transpilation. The engine is compiled with Shed Skin, then imported in a larger program that uses Pygame for the UI (see also a before-after video).

Version 0.9.13 is the first version that was heavily improved by the use of AI (more specifically, Claude - thanks to Shakeeb for starting this). It was able to spot (and fix) many bugs, especially in the C++ backend, but also test gaps. It also helped to add support for many missing features in Python 3.15. We are now actually pretty close to full compatibility there, at least with regards to the supported modules and everything that is compatible with Shed Skin (no os.walk yet, for example, as it uses heterogenous tuples of length > 2, something we may fix for 0.9.14).

The use of AI should make it much easier to contribute as well. For example, if your program doesn't work, AI can minimize it and produce a useful bug report to submit to the project. It can even start to try and fix the problem, create new tests and so on. Or otherwise look for gaps/bugs to work on.

vrijdag 5 december 2025

Shed Skin restricted-Python-to-C++ compiler v0.9.11 released

I have just released version 0.9.11 of Shed Skin, a restricted-Python-to-C++ compiler. Most importantly, it adds support for Python 3.14. It also adds support for many 3.x features that were not yet implemented, in addition to basic support for the base64 module. It also optimizes a few more common code patterns.

Paul Boddie was able to add support for libpcre2, and in the process updated conan to version 2. Thanks to Shakeeb and now Paul, Shed Skin has had first-class Windows support for the last few releases.

A new release is often triggered by a nice new example. In this case I found an advanced/educational 3d renderer by Benny Bobaganoosh, and rewrote it from Java to Python. In ~500 lines of code, it renders an .obj file with perspective-correct texture mapping and so on, clipping, lighting.. It becomes about 13 times faster after compilation (in other words, it goes from about 2 to about 30 FPS).

For the full list of changes in the release, please see the release notes.

Something I have noticed while working on this release is that small object allocations seem to have become faster under Linux, to the degree that programs that would become _slower_ after compilation because of excessive small-object allocation, are now usually _faster_ again, at least on my system. This motivated me to measure the speedup for all 84 example programs at the moment versus cpython 3.13. While it's still all over the place, I was happy to see a median speedup of 12 times, and an average of 20 times.

I would very much appreciate more feedback on/assistance with the project. There is always enough low-hanging fruit to help with! See for example the current list of issues for 0.9.12. But just testing random things, finding interesting new example programs, cleaning up parts of the code and such are also much appreciated.

donderdag 27 juni 2024

Shed Skin restricted-Python-to-C++ compiler 0.9.9

I have just released version 0.9.9 of Shed Skin, a restricted-Python-to-C++ compiler. It comes with many changes under the hood to improve the code base. For example, Shakeeb has started adding type annotations to Shed Skin itself, whereas I have fixed many C++ compiler warnings. We have also replaced the old CPython-based dict and set implementations with STL unordered_map and unordered_set. While this may cost some performance for especially small toy programs, it really helps with maintainability.

There was also a type inference improvement, which hasn't happened in a while since it wasn't needed. It was however needed to add a cool new example called "pycsg", which shows how one can perform CSG (constructive solid geometry) using binary space partitioning (BSP). After some investigation I decided to make the type inference slightly less "optimistic", which should make it scale a lot better, at the cost of being slower overall. In the end this new example runs about 15 times faster after compilation on my system (not 15%.. 15 times!).

Most notably on the outside, Shed Skin now comes with --floatXX/--intXXX options, which allow you to specify the desired float/int precision. Unfortunately under windows, --int128 does not yet work, since C++ has not yet standardized 128-bit integers.. The relatively new othello2 and collatz examples now require --int64 and --int128, respectively, to function properly.

For the full list of changes, please see the release notes.

I would like to take this opportunity to (once again) invite others to help out in Shed Skin development. There is always enough to do, also low-hanging fruit, on both the Python and the C++ side of things. I at least think it is rather fun to work on.. :) Let me know if you'd like to contribute but aren't sure what you could bring to the table.

Of course just sending in feedback or new example programs (especially if they fail!) can be very motivating as well to keep improving things.

zondag 9 juli 2023

LEGO Othello board

I have a weird bucket list. One remaining item was to create a full-size, playable Othello board, with ridges to avoid discs from moving around. I finally decided to try and mimic an existing board. The result looks pretty close to the original:
Unfortunately I was unable to figure out how to create smooth (and yet flat) discs, but they are at least quite playable. Suggestions for improvements are welcome. I'd also be happy to share more information or even a parts list anyone would like to recreate it.

zaterdag 1 april 2023

Shed Skin restricted-Python-to-C++ compiler 0.9.7

I have just released version 0.9.7 of Shed Skin, a restricted-Python-to-C++ compiler. The highlight of this release is native Windows support, by moving to CMake (and Conan). Shakeeb Alireza came up with this idea and did most of the implementation. So to build something on Windows, one doesn't need a weird emulation layer like MingW anymore, just Visual Studio build tools, CMake and Conan (popular tools that many will already have installed). He also made sure that most things work under OSX. Here is a screenshot of an (also) new DOOM-engine example running under windows:

With the recent Python 3 and now native Windows support (plus an ever growing Python community), I'm hoping the project will see more usage and feedback/contributions over the coming years. Please consider joining the project, as there is always enough to do!

Besides other contributions from Folkert van Heusden and Humhue, the release comes with many other improvements, such as support for relative imports, the walrus operator and struct.pack_{from, into}. See here for the full release notes.

dinsdag 28 februari 2023

Fast DOOM WAD renderer in 999 lines of Python

For the longest time, I've wanted to re-implement the original DOOM engine in Python, and compile it with Shedskin to get reasonable performance. So when I finally ran across a pretty small engine written in Java, by Leonardo Ono, I decided to convert his version to Python.

I left out some optimizations (most notably "visplanes"), for readability and in order to keep everything under 1000 lines of code (while following PEP8). So it could run quite a bit faster still. This is including a WAD loader and interactive Pygame wrapper, that makes it almost feel like you are playing DOOM.

It's interesting how using Python (using just CPython) seems to be about as fast as using assembler back in the day.

This video shows the day-and-night difference in FPS after compilation using Shedskin.

The source code can be found in the Shedskin examples directory.

I may revisit the code now and then, to try and improve readability by adding comments and/or refactoring parts. Patches in this direction very much welcome of course.

zondag 25 december 2022

Shed Skin restricted-Python-to-C++ compiler 0.9.6

I recently decided to sit down and finally port Shed Skin, an experimental restricted-Python-to-C++ compiler in the works since 2005 or so, to Python3. Three painful months and a total diff of 50k lines later, everything now works with Python3 (Shed Skin itself, and all tests and examples..)

This does not mean that every Python3 feature is supported, but what was there now at least works fine with Python3.. For example, unicode is still restricted to 1-byte characters, and there is no support (yet) for nice new features such as f-strings. Python2 support has been dropped with the new release, and subsequent releases should add support for various new Python3 features.

The following people have contributed along the way:

  • Johan Kristensen (large patch for moving from compiler.ast to ast, still on Python2)
  • Shakeeb Alireza (extension module support for Python3, ported many examples, improved OSX support, and various code cleanups)
  • Folkert van Heusden (some fixes on the C++ side, move to c++17)
  • Jeremie Roquet, Thomas Spura, Paul Boddie and others who kept doing maintenance on the project in my absence

I started work on the port after realizing that Shed Skin was being removed from distributions, especially Debian, as it was still tied to Python2, and I really want to keep Shed Skin in a working state if possible.

So what about the future of the project? Not really sure, but I'm happy to sit down again in a few months to prepare a new release. Any feedback on what to support or improve would be very welcome!

For fun, here are screenshots of some of the Shed Skin example programs (in total 75 working example programs can be found on the github site):

dinsdag 22 maart 2022

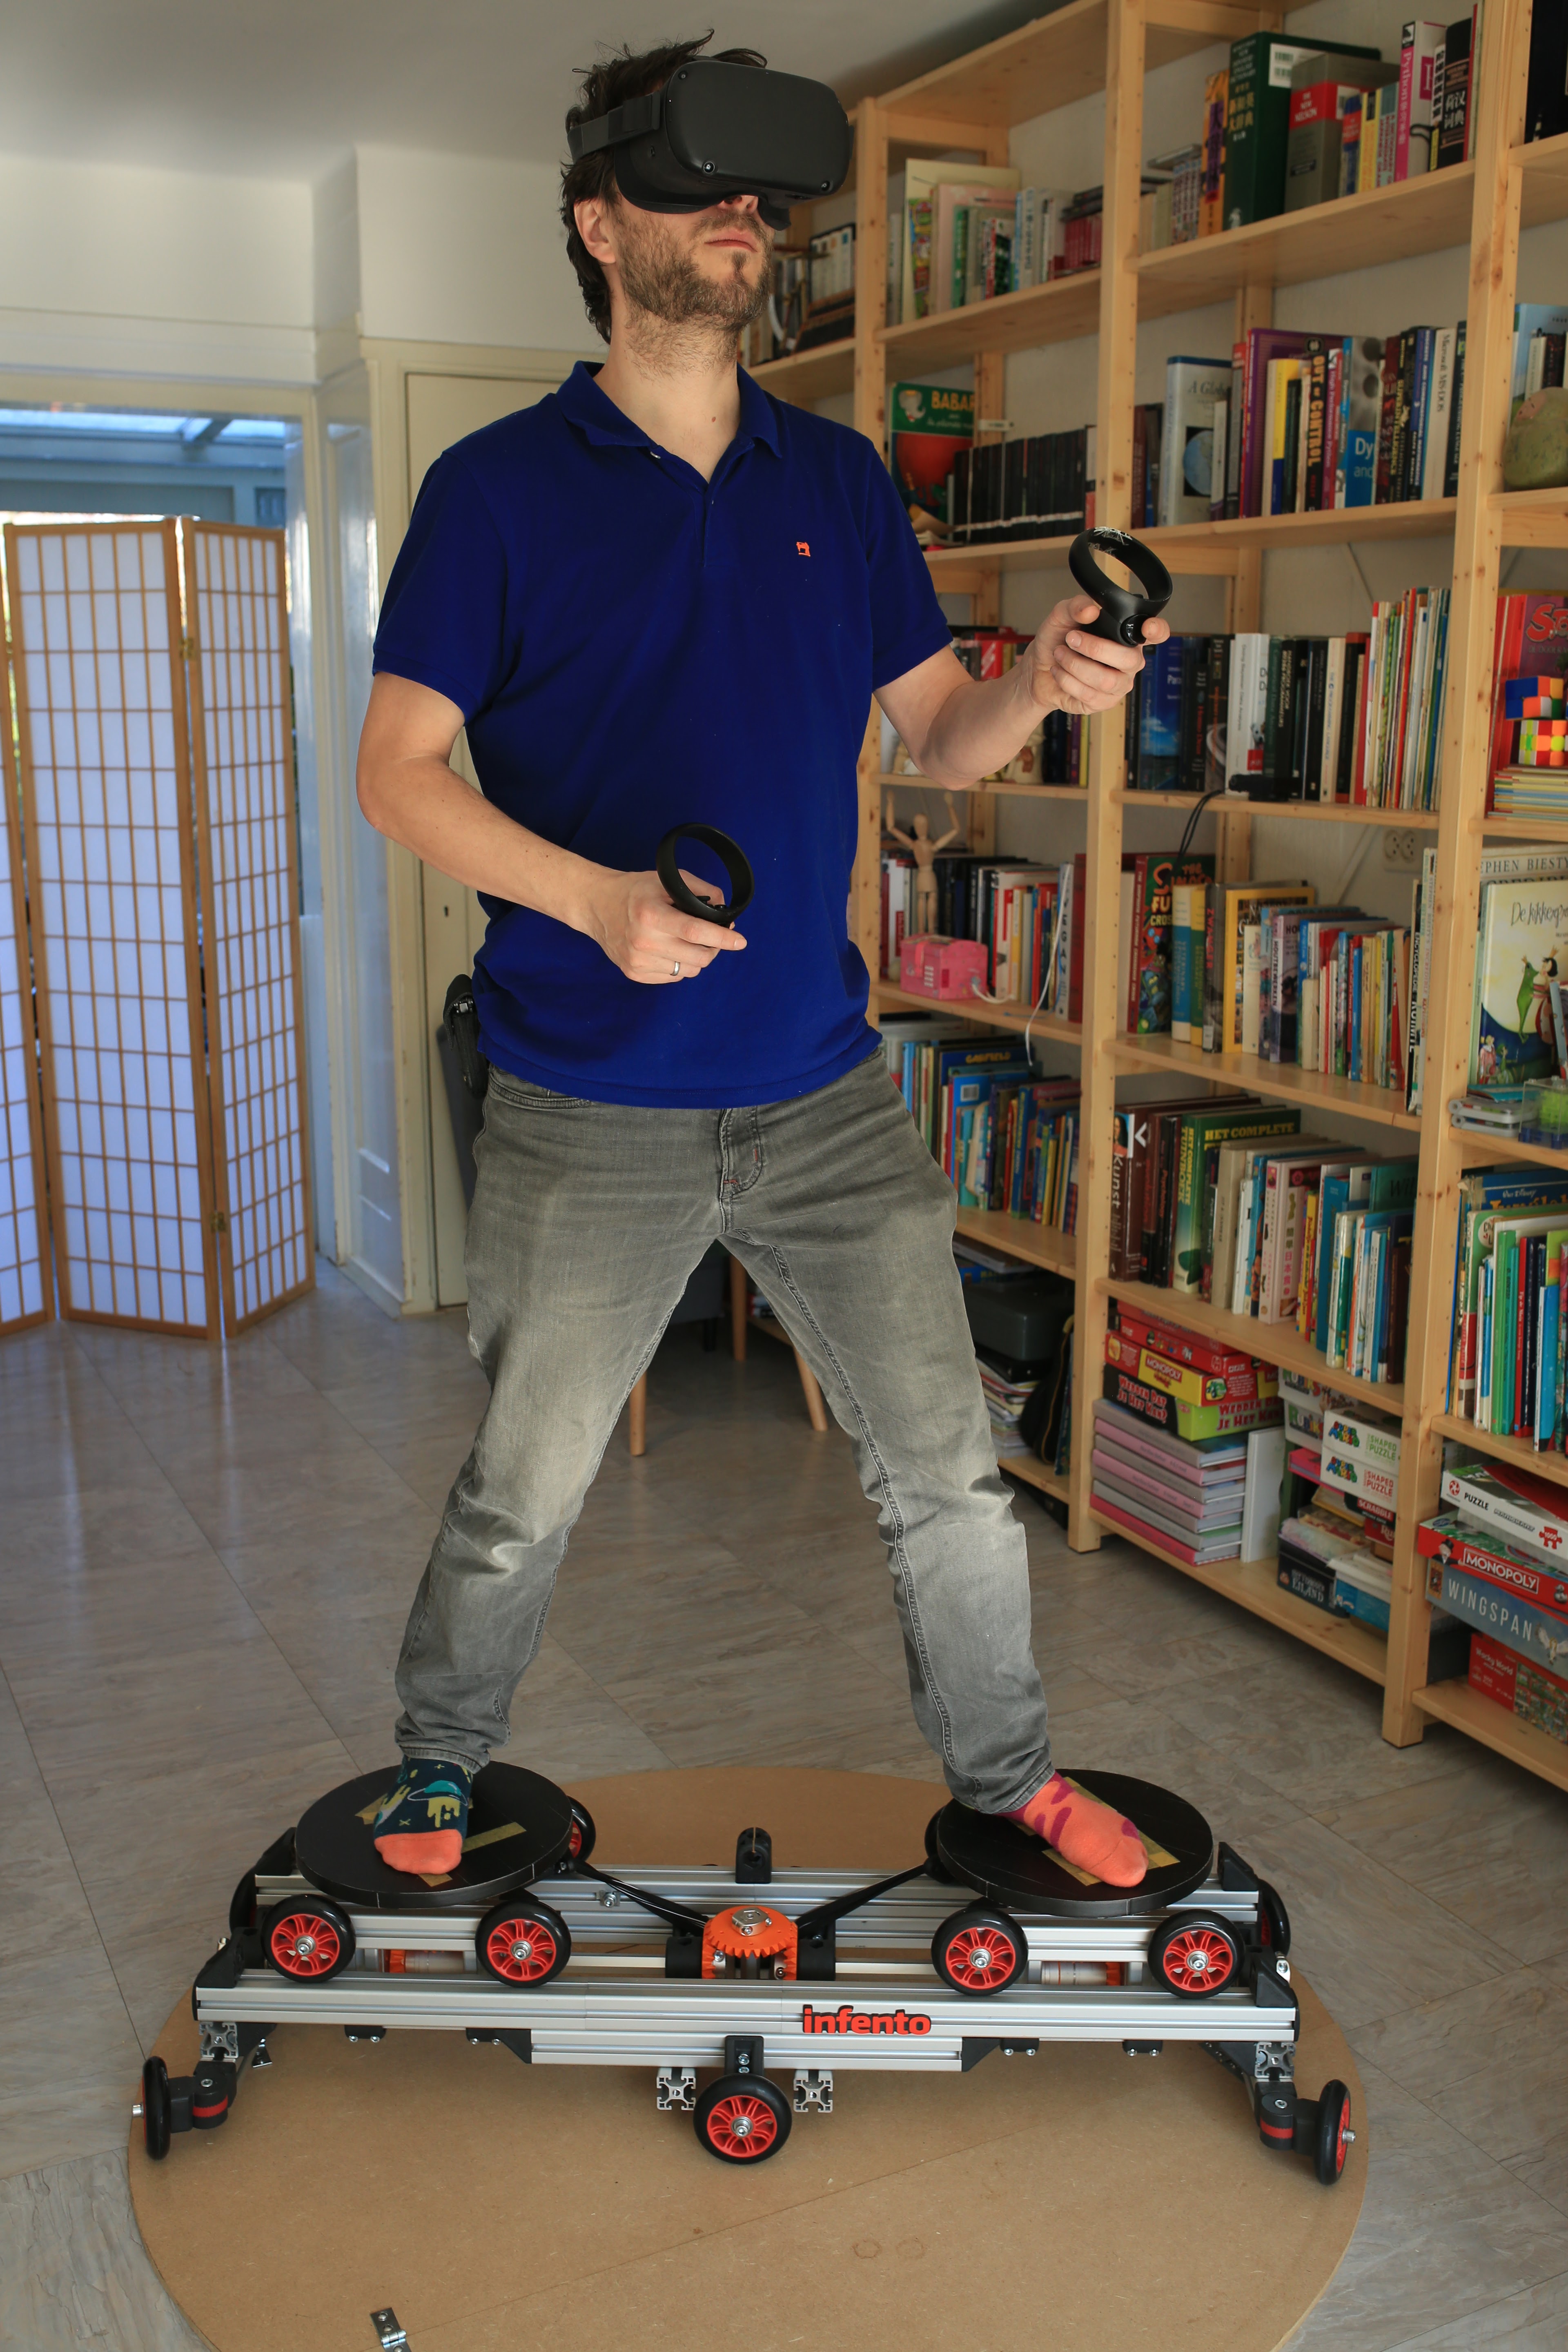
TACO VR: an Infento-based omnidirectional treadmill (unfinished prototype)

The initial excitement of owning a wireless headset such as the Oculus Quest is quickly followed by disappointment in the size of one's living room. Unfurtunately there does not seem to be a solution to the problem of not being able to move around by more than a few meters without using the controllers in an awkward manner, or a satisfactory solution to me at least. For example, I really feel like one should also be able to walk up and down hills, or climb stairs and that such a thing should be possible.

There are various categories of existing solutions, each with significant downsides. There are the infinideck-type omnidirectional treadmills, which seem really expensive and bulky by design, and probably very noisy as well. Not that great for most living rooms. And as I mentioned, they cannot offer up/down movement without a completely separate system. Then there are the 'gliding bowl' solutions such as the kat-vr. This works, and to be honest I haven't tried one, but this just cannot feel very realistic. I do appreciate the elegant, cheap solution, and I mean that as a compliment. But again, there is no possibility for up/down movement. Finally, there are the prototypical "magical" shoes, that can perhaps move up and down in theory, but having to wear (bulky) shoes doesn't do it for me either. I want to be able to "feel" the ground with my own shoes, or even with my bare feet.

With this blog post, I would like to introduce my own type of solution. I'm sure others have thought of similar things, and it's not entirely finished either, so I can't yet say if it will work like I think it will or if it will turn out to be a dead end. I have mostly just been having fun working out the mechanical concept using Infento, which is a highly-recommended product for protopying sturdy mechanical devices (initially developed for making/rebuilding children's bikes). I also had to 3d print some gears, as Infento doesn't sell these (perhaps out of safety concerns - you really don't want to have kids fingers in there..).

I was worried that some Infento parts would not be strong enough to hold my weight, but so far they have held up great.

The core idea is to have a central 'rail system' that rotates with the line between your feet. Each foot has its own moving platform on this rail, that (after adding sensors and motors) follow the respective foot, and ultimately catch the foot as it comes down. After catching a foot, and based on the motion and direction of the other foot, the platform moves back to a natural position to continue walking or may stay in the same place (for example while the user is turning). But all of this is a bit hard to explain, so I tried to film the general idea (note of course that for a final solution it should be possible to lift your feet and walk/turn naturally!).

Video showing movement

The gears connect to the stationary base plate and make sure that the platforms are always facing the same direction, much as the tiles of your floor. The same effect could be achieved by adding more motors, but I thought this was interesting anyway, and probably cheaper and more silent in the end as well.

So while there is no support for up/down movement at the moment, it is clearly possible to make the platforms go up and down, or potentially even tilt (slightly).

If this were to become a real product, for safety there would probably need to be a large circular encasing (could be much more flat!), plus something to catch you if you lose your balance, much like the other solutions. The platforms would stick out of a slit in the middle, again potentially moving up/down. It would not be cheap, but could perhaps be relatively cheap when built as an open source kit. But to be honest, I'm not sure I will ever continue work on this prototype, so I'm just putting it out there.

Additional photos

update: I've started to collect specifications, parts lists etc. on github.

woensdag 6 maart 2019

interlocking modular origami unit 2 (IMORU2)

The original Sonobe modular origami unit is almost like a "lego block" for origami structures, but falls short in that the result is often not very rigid and/or falls apart without using adhesives. My previously published unit, called IMORU1, utilizes interlocking hooks to work around this problem.

It works a lot better, but after playing with it further for a while, I realized it also has two annoying issues: the hooks are a bit difficult to insert (and arguably a bit clunky/inelegant), and much worse, it is still not always completely rigid at the corners.

So I went back to the drawing board, and finally found something which has easier to insert hooks, is rigid in all corners and is actually also easier to fold. I'm not sure if it can still be called a Sonobe variation, but it's definitely inspired by it. This time I also tested it better. Here are some basic example structures:

And here's the diagram of how to fold it.

Photo of the completed unit:

Finally, a youtube video showing how to fold and join units.

Now, there still is one minor issue left with IMORU2, in that edges are not always taut, but this is basically cosmetic and doesn't affect its functionality. I may try to find an improved IMORU3 sometime in the not too distant future. But for now, let's first try to fold a few thousand of this.. O_o

Update: The diagram, plus some more details, were added to the OrigamiUSA diagrams page.

zondag 3 december 2017

Prusa MK2+MMU

I recently built a Prusa MK2 + MMU (multi-material upgrade), using only PLA parts printed on my T3P3 delta printer. I wasn't entirely sure PLA was going to work for the extruder parts, as the parts that come with the kit are printed in ABS. After more than 100 hours of printing with it, I think it's safe to say that this works just fine, at least when printing with PLA (at around 200 degrees celcius).

The multi-material upgrade is a lot of fun. I had a minor issue at first, where the filament would repeatedly get stuck at the end of the cooling tubes. I decided to ream the filament path(s) below the cooling tubes with a 1.85mm drill, and haven't had an issue since (knock on wood). I love the simplicity of the whole thing, and the ease with which the multiplexer opens up to debug any issues.

For anyone interested in getting a multimaterial upgrade, it's probably good to know that the normal wipe tower settings don't work very well for especially black filament. In order to avoid filaments 'colour bleeding' into each other, I usually had to double the wipe tower size. In combination with constant filament switching, this means you should be prepared for very, very long prints, across multiple days for moderately large objects (with many colors). The large kirby above (about the size of a tennis ball) took 11.5 hours to print. Another thing to consider is that print quality seems to suffer sometimes, I guess because of the bowden setup, especially if a color is only used for a small detail (see for example the eyes of the small omnom above.) Interestingly, it seems that this depends on filament (color).

I will play more with multicolor prints in the future (when hopefully there will be filament available with less bleeding, as well as per-filament settings for the wipe tower!). I will also play more with supports, and hopefully print my SNES controller again with it. I already printed a donkey using BOVH for support, and found out that doubling the wipe tower is also a good idea with supports, or the main part may become brittle:

maandag 28 november 2016

Open Sourcing the SNES Controller

About two years ago, I published a precise 3d-model for the SNES controller on Thingiverse. Not long after this, when reading about the PCB Cyclone, a 3d-printed milling machine targeted towards PCB creation, I decided to build it at some point to be able to recreate the electronics (in style, that is..)

It took me a while to get the milling machine to work. More specifically, I couldn't get the auto-leveling to work reliably using the Marlin firmware. Precise auto-leveling is especially important when milling PCBs, as the copper layer is only about 0.04mm thick, and PCBs aren't usually very flat. I even tried a development branch which supposedly comes with mesh-based auto-leveling. Once I started to appreciate the more-or-less recommended bCNC software, I quickly got it to work pretty well. Perhaps it would be better if there were no Marlin branch for the Cyclone..

Getting the electronics right was also challenging, as there doesn't seem to be precise documentation online for building the electronics for a PAL controller. In the end it turned out I just needed to add a single resistor of a pretty specific value on just the clock input (467ohm in my case), and everything worked like a charm. If you are stuck building a PAL controller, where only the B button works, the solution may well lie in this direction..

The schematics which I used in the end come from Raphael Assenat. These schematics were the first I got working (IIRC without any pull-up resistor!), but I guess other schematics would work as well for a PAL controller, with the right pull-up resistors, and this might obviate the need for an inverter (chip). That would open up some space for a nice connector perhaps.

I still need to model the connector, print the flexible rubber parts using some flexible filament, and mill the two small PCBs for the L & R buttons, to be able to say the SNES controller is now fully open-source, but this should all be relatively simple. I may wait until my next printer to try flexible filament first, and if that results in working parts, I might well be motivated enough to go all the way.. I would also love to print the whole controller again using soluble support material..

During the process, I've become a big fan of both KiCad and FlatCAM. Using these, modeling the electronics, resp. converting them into gcode to send to the milling machine was a piece of cake. But bCNC is also rather great. One tip for using bCNC: make sure you get the Z height approximately correct, before doing anything else (so before any kind of probing), or your milling machine may be attempting harakiri..

maandag 5 september 2016

Becoming Vegan

I've always had issues with consuming animal products, for ethical reasons, but passively assumed that they were necessary for health, or that it would be complicated to meet my nutritional needs without consuming them. So when I became convinced, about a year ago, that it is not necessary (or even healthy), and actually very simple to meet your nutritional needs as a vegan, becoming a vegan was the easiest decision I've ever made. Because I realized that animal suffering is completely UNNECESSARY to create healthy food, which makes consuming animal products about as morally right as slavery.

And I really hate bullshit, so you can be sure I researched this quite thoroughly. Go to Youtube, and see who you believe for yourself. Do you believe the emeritus professor in nutrition, Dr. T. Colin Campbell, a seeker-for-truth kind of guy, who researched the topic his entire career, or the dumb weightlifter who says you need the protein..? Do you believe a meta-study performed by the World Health Organization which tells you processed meat increases your risk of dying from cancer, or some industry-sponsored paper which tells you everything is fine, and just keep consuming please?

Basically there are three important reasons to stop consuming animal products:

-Your own health. Most western people, especially in America, die from diet-related diseases. If you don't believe this, watch the documentary "Forks over Knives" and look into "The China Study". Another great book about this topic is "How Not to Die" by doctor Michael Greger. If you believe a vegan diet cannot be healthy at all, you just disagreed with many major health organizations: https://www.reddit.com/r/vegan/wiki/dieteticorgs.

-The horrendous suffering and killing of billions of sentient animals EVERY YEAR. Trillions of animals if you count fish. Especially mammals are practically human in their physiology and neural chemistry. Consider female cows, for example. Female cows are systematically raped, and their babies taken away from them (in many cases to be eaten!), just so we can drink mother's milk from another species. Please watch the documentary "Earthlings" to appreciate such practices better, and hopefully "make the connection".

-Our planet's resources and biodiversity are quickly being destroyed to support animal agriculture. Did you know that to produce 1 kilo of beef, you need on the order of 10000 liters of water, and on the order of 50 kilo's of animal feed? This represents an insanely inefficient use of water and land. Not to mention all the waste products making their way into the oceans. But it gets worse: animal agriculture, when taking all its factors into account, is quite likely the largest single contributor to global warming. Watch the documentary "Cowspirary" for more (accurate) facts.

It is impractical for a short blog post to dive into all the other facts and considerations I would like to mention about this topic, and it probably wouldn't be very effective. You might just think I'm insane. So I would just like to encourage anyone reading this (hi, mom!) to investigate the truth for themselves, and try to live vegan for a month. Especially Youtube seems to be a great way to get information, which used to be buried in the scientific literature, in a simple and convenient way. I will leave you with the following quote.

zondag 8 maart 2015

Polymax Filament Review

It took me a quite some effort to be able to print more or less reliably with ABS on my previous printer. When faced with another such exercise for my new Kossel Mini build, I quickly decided to investigate the current state of PLA filament again (not being very impressed before).

I quickly came across Polymax, a type of PLA which in fact behaves very much like ABS. But being PLA, it doesn't have any of the warping problems or toxic fumes (think of the children!), and it's even biodegradable. After having used about a spool, I'm sure I will never move back to ABS.

In retrospect, ABS just has too many drawbacks to be the 3d printing filament of the future. PLA stands a much better chance, and indeed a lot more research seems to be going on for PLA than for ABS. I'm hoping to try out some filaments from ColorFabb next, but for now here are some observations about Polymax.

Btw, I have to say I also switched from Slic3r to KISSslicer at the same time, which also helped a lot. I'm the biggest fan of open source software, but in the end Slic3r just gave me too many problems, and after all this time it still doesn't have basic support structures which actually work for me. KISSslicer almost never does anything stupid, and just works, also for support.

On the positive side:

-It really is tough, and I believe it's true that it's stronger in some ways than ABS. I don't think the blockbot or ozo bear would still be with us today if they were printed in regular ABS, given that my kids have played with them (note that the internal pins for there have also been printed!).

-It has pretty good flexibility before deforming gracefully.

-Bed adhesion is insane. At 70 degrees celsius, and 3dlac hairspray, I need to soak the glass bed in water before being able to separate anything. After a good soak parts usually come off by hand.

-The finish is great, and post-processing is really easy, because of a certain softness which makes it feel the material could be sculpted in fact.

-The white color is really, really white, and the filament diameter seems very consistent as well. Packaging is great.

-No issues occurred while printing the shown objects.

On the down side:

-It seems a bit soft, which I'm not sure will work very well for parts like gears, where there is possible wear involved. The blockbot went from hard-to-move to pretty loose quickly, for example.

-There are only two colors available at the moment, which quickly gets boring.

-It's still PLA, so it probably gets soft at temperatures above 70 degrees or so (haven't tried).

To summarize, this is one hell of a filament, and a very promising alternative to ABS in many cases. Unless some kind of miracle occurs, I won't be using ABS again. We need more colors though.

Next up, I'm probably going to try some other "enhanced" PLA filaments, probably starting with those provided by ColorFabb.

zondag 8 februari 2015

Adafruit Gameboy Review

After messing with ABS for a long time, I finally decided to switch back to using PLA. But more about this in an upcoming blog post. My first project using PLA again was to print the outside of a gameboy, to go with a wonderful gameboy kit from Adafruit.

I bought this kit on an impulse, and while building it was a nice experience and I still like it a lot, I thought I would write down some minor issues that I've had with it, and that I would have liked to know about in advance.

- it doesn't come with a built-in speaker, or with basic instructions how to add one. they do sell components for this at adafruit, but I would have liked some hand holding.
- it doesn't come with a suitable SD card, which would have been nice, as a normal SD sticks out almost 2 centimeters. adafruit actually sells "half-size" SD cards.
- the tutorial describes the needed screws using non-metric standards, and it would have been nice if these could also be easily ordered.
- two pins on the LCD screen connector were sloppily soldered and actually making contact with each other.
- finally, the software (taken from their "cupcade" project) does not include a gameboy emulator by default! I really would have liked to play the original tetris on this thing (and with a speaker)

While I could have used my SNES controller model on thingiverse to print the buttons, and possibly even the elastomers using flexible filament, I really was in a bit of a hurry (possibly also explaining some of my complaints above), so I just used the fake SNES controller from adafruit.

In all, a very nice building project, but in the end it took me a bit more time than would have been possible (see above complaints), and I'm not sure yet if I will go the extra mile of adding a speaker or figuring out how to get the original tetris to work.

maandag 22 december 2014

ABS polishing

After polishing an ABS print for a weekend, I decided there should be a faster method than polishing with ever finer grit by hand..

(For more information about this polishing job and model, please see here)

So when cold acetone vapor techniques came around, I decided to give it a try. Turns out that for delicate/mechanical models you really don't want them in the vapor for too long, which means you probably want to sand them a bit first to get nice results. And you also want some kind of rotating device probably, to avoid the tops of objects to collapse inwardly..

But if we have to sand anyway, and we have a pretty precise printer (as shown below), do we still need acetone vapor to get a nice finish..? While experimenting a bit, I found that for objects printed on my kossel mini, it's pretty quick to sand with grit 150 or so (to get rid of any ridges), then with 300 or so (to give a much smoother feel) and then to finish things off with a bit of steelwool. The result is an almost lego-like (though matte) finish.

In the meantime, I actually tried a vibrating tumbler (with some serious cutting action, but it didn't make a scratch) and various dremel brush heads, but so far nothing I've tried comes close to good old manual sanding. I'm sure that in the future there will be a faster (chemical?) smoothing process, but for now I will stick with manual sanding.

donderdag 11 december 2014

delta printer precision

I more or less finished my Kossel Mini build, and after some easy calibration steps (just following along with the think3dprint3d documentation), I am already amazed with the printing quality that I'm getting.

I was never able to get really uniform z layer heights on my Mendel Max, but for delta printers this does not seem much of a problem. A colleague helped me to make a close-up photo of a print with 0.2 mm thick layers, and as you can see the precision seems to be insane, in every direction. There also seem to be much less surface artifacts caused by vibration.

In fact, with this kind of precision it probably becomes a lot easier smooth the surfaces in post processing. After a bit more calibration to avoid ABS warping, I hope to start looking into this.

maandag 1 december 2014

think3dprint3d.com kossel mini kit

I just finished printing the plastic parts for my new 3d printer, a Kossel Mini, to be built from a very nice kit sold at think3dprint3d.com.

Some issues I ran into so far:
-the extruder motor spacer was missing (quickly added by think3dprint3d)
-the legs on the LCD panel were a bit long and would only fit when heightening the printer considerably (quickly fixed by think3dprint3d, awesome!)
-the z-probe pin hole is modeled way too big. while the pin is only 1.5mm thick, the hole is 2.6mm, so I had to print the z-probe holder twice.
-the hole made in the effector is only 4mm deep, whereas the hotend I received requires a 4.8mm hole.
-the anti-chatter parts are a bit ugly, so I replaced them with pull springs, attached with zipties.
-I couldn't find the new extruder mounter, so took it from elmuchacho's thingiverse account -homing speed by default is set a bit high in the provided marlin firmware. it at least made me turn off my printer very quickly while homing for the first time.

Other than these issues (which you mostly won't run into with the provided plastic parts), I can highly recommend this kit to anyone who would like to build a reprap-style delta printer (with out-of-the-box heated bed). For me the biggest thing which is still missing is dual extrusion, to enable dissolvable support structures.

I hope to report after calibration on the resulting precision of printed parts. If it's really good (z-precision wise), I intend to also play with cold acetone vapor to see what happens to precisely printed mechanical parts.

dinsdag 18 november 2014

Coming soon

Random postings about 3d printing, UNIX, open source software and Python programming.